Free Lace Crochet Cardigan Pattern – Elegant and Easy
Create a stunning lace crochet cardigan with our free, easy-to-follow pattern. Perfect for beginners and intermediate crocheters, this pattern includes step-by-step instructions for a beautiful, lightweight cardigan.

Free Lace Crochet Cardigan Pattern: Step-by-Step Guide
Looking for a versatile and stylish addition to your wardrobe? This free lace crochet cardigan pattern is perfect for both beginners and intermediate crocheters. With detailed, step-by-step instructions, you can create a beautiful, lightweight cardigan that's perfect for layering in any season.
Skill Level: Intermediate (beginner-friendly with detailed instructions)
Materials Needed: DK / 3- weight yarn (or the one matching gauge), size US G-6 (4.0 mm) crochet hook, tapestry needle, stitch markers, scissors
Finished Sizes: XS (S, M, L, XL) (2X, 3X, 4X, 5X)
Stitches Used: Chain (ch), double crochet (dc), single crochet (sc), slip stitch (sl st)
Pattern Includes: Written instructions, size adjustments, visual guides
Size Guide
Finished Bust: 34.5” (39”, 42.5”, 49” 52”) (55”, 60”, 63”, 68”) / 86 ( 98, 106, 122, 130) (138, 150, 158, 170) cm
To-fit-bust: 30” (34”, 38”, 42”, 46”) (50”, 54”, 58”, 62”) / 75 (85, 95, 105, 115) (125, 135, 145, 155) cm
Length (easily adjustable): 21” (22”, 22”, 22”, 23”) (24”, 25”, 25”, 25”) / 52 (54.5, 54.5, 55.5, 58) (60, 62, 62, 62) cm
Armhole: 13.5” (15”, 15”, 17”, 18.5”) (20”, 20”, 21.5”, 21.5”) / 34 (38, 38, 42, 46) (50, 50, 54, 54) cm
Yarn
Recommended Yarn: Ultra Pima from Cascade yarns (100% Pima Cotton. 220 yds (200 m) per 100g-skein) or other DK / 3-weight yarn as long as you meet gauge.
Yarn usage: 5 (6, 6, 7, 7) (8, 9, 9, 10) skeins of Ultra Pima. Sample made in color 3721 Ginseng. 1000 (1200, 1270, 1370, 1480) (1620, 1770, 1910, 2020) yds / 910 (1100, 1160, 1250, 1350) (1480, 1620, 1750, 1850) cm
Crochet Book Now Available - 21 Patterns
〰️
Crochet Book Now Available - 21 Patterns 〰️
Construction and notes
The Shell Stitch Cardigan is worked in body piece and two sleeves. All worked flat in rows. These are then seamed together to make the cardigan and a neckline ribbing is added to the body. The sample has 3/4 sleeves but you can adjust the length as you wish.
The cardigan in the pictures is a sample cardigan made in size S (with 2” (5 cm) positive ease).
This pattern is written using US terminology.
Abbrevations
ch(s) = chain(s)
st(s) = stitch(es)
dc = double crochet
sc = single crochet
sc-BLO = single crochet back loop only
sk = skip
in ss = in the same stitch
sl st = slip stitch
yo = yarn over
sm = stitch marker
rs = right side
ws = wrong side
Learning the stitch and checking your gauge
Ch 22
Row 1: In the 2nd back bump from the hook, sc. Sc in every ch across. Turn. (21 sts)
Row 2 (ws): Ch 1, Sc, sc, *sk two sts, 7 dc in ss, sk two sts, sc* repeat until the final st. Sc in the final st. Turn.
Row 3 (rs): Ch 3 (counts as dc), sk st, dc. *Ch 3, sk 3 dc and sc in the 4th dc, ch 3, sk 3 dc, dc in the sc* repeat until the final st. Dc in the final st. Turn.
Row 4 (ws): Ch 1, Sc, sc. *Sk the 3 chs, 7 dc in the sc, sk 3 the chs, sc in the dc* repeat until the final st. Sc in the 3rd turning ch from previous row. Turn.
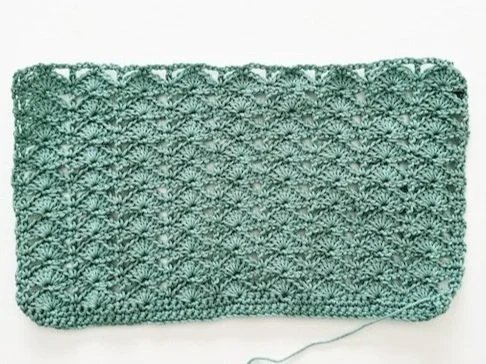
Repeat row 3-4 until you’ve made a total of 10 rows (including row 1).
Measure your swatch.
Measuring your swatch
You have two ways to check your stitches across for this pattern, for both it should be 4” (10 cm) wide. You can either check that you have 15 sc across measuring row 1. Or measure across row 2 - 3 starting from the edge. Starting from the right edge you should have the two dc on the edge, 2 shells and then the dc after the shell plus one of the dcs of the third shell (this also adds upp to 15 sts) - see the video tutorial for exact measurements.
Height is simply measured from above row 1 and until the end of the 10th row - that should be 4” (10 cm) in height.

The Pattern
Note! Stitch count is mentioned for the first row. For the consecutive rows, make sure you have 2 sts per edge and then 21 (24, 26, 30, 32) (34, 37, 39, 42) shells. Use the hook size you met gauge with. Turning chains do not count as stitches, if not mentioned that they do.
Body
Ch 130 (148, 160, 184, 196) (208, 226, 238, 256).
Alternatively make 129 (147, 159, 183, 195) (207, 225, 237, 255) foundation sc and skip row 1.
Row 1: In the 2nd ch from the hook, sc. Sc in every st across. Turn. 129 (147, 159, 183, 195) (207, 225, 237, 255) sts
Row 2 (ws): Ch 1, Sc, sc. *Sk two sts, 7 dc in ss, sk two sts, sc* repeat until the final st. Sc in the final st. Turn.
Row 3 (rs): Ch 3 (counts as dc), sk st, dc. *Ch 3, sk 3 dc and sc in the 4th dc, ch 3, sk 3 dc, dc in the sc* repeat until the final st. Dc in the final st. Turn.
The Beginner's Guide to Crochet Sweaters and Tops - Crochet Book now available - 21 patterns
〰️
The Beginner's Guide to Crochet Sweaters and Tops - Crochet Book now available - 21 patterns 〰️
Row 4 (ws): Ch 1, Sc, sc. *Sk the 3 chs, 7 dc in the sc, sk 3 the chs, sc in the dc* repeat until the final st. Sc in the 3rd turning ch from previous row. Turn.
Repeat rows 3-4 until you’ve made a total of 31 (33, 33, 31, 31) (33, 33, 33, 33) rows (not including row 1). Do not fasten off, continue with the fronts and back.
Place a sm in the first and last dc of the 5th (6th, 7th, 8th, 8th) (9th, 9th, 10th, 11th) shell from each edge.

Note! For the fronts make sure you have 2 sts per edge and then 4 (5, 6, 7, 7) (8, 8, 9, 10) shells.
Front 1
Row 1 (rs): Continue from your working yarn. Ch 3 (counts as dc), sk st, dc. *Ch 3, sk 3 dc and sc in the 4th dc, ch 3, sk 3 dc, dc in the sc* repeat until the st before the sm (picture D). Dc in the st with the sm. Turn.


Row 2 (ws): Ch 1, Sc, sc. *Sk the 3 chs, 7 dc in the sc, sk 3 the chs, sc in the dc* repeat until the final st. Sc in the 3rd turning ch from previous row. Turn.
Row 3 (rs): Ch 3 (counts as dc), sk st, dc. *Ch 3, sk 3 dc and sc in the 4th dc, ch 3, sk 3 dc, dc in the sc* repeat until the final st. Dc in the final st. Turn.
Continue to repeat rows 2-3 until you’ve made a total of 17 (17, 17, 19, 21) (21, 23, 23, 23) rows** on the front. Fasten off, leaving a tail of three times the width of the front for sewing the shoulders.
**Please have a look at the sleeves instructions and decide which size you are making for the sleeves. If you adjust the sleeves size you also need to make the numbers of rows here matching with the sleeve size (you should end on a row 3).
Front 2
Row 1 (rs): Attach your yarn in the st with the fourth sm (counting from front 1 with the rs up). Ch 3 (counts as dc), sk st, dc. *Ch 3, sk 3 dc and sc in the 4th dc, ch 3, sk 3 dc, dc in the sc* repeat until the final st. Dc in the final st. Turn.


Row 2 (ws): Ch 1, Sc, sc. *Sk the 3 chs, 7 dc in the sc, sk 3 the chs, sc in the dc* repeat until the final st. Sc in the 3rd turning ch from previous row. Turn.
Row 3 (rs): Ch 3 (counts as dc), sk st, dc. *Ch 3, sk 3 dc and sc in the 4th dc, ch 3, sk 3 dc, dc in the sc* repeat until the final st. Dc in the final st. Turn.

Continue to repeat rows 2-3 until you’ve made a total of 17 (17, 17, 19, 21) (21, 23, 23, 23) rows on the front (or as many as you made for front 1). Fasten off, leaving a tail of three times the width of the front for sewing the shoulders.
Back
For the back make sure you have 2 sts per edge and then 11 (12, 12, 14, 16) (16, 19, 19, 20) shells.
Row 1 (rs): Attach your yarn in the st with the second sm (counting from front 1 with the rs up). Ch 3 (counts as dc), sk st, dc. *Ch 3, sk 3 dc and sc in the 4th dc, ch 3, sk 3 dc, dc in the sc* repeat until the final st. Dc in the final st. Turn.

Row 2 (ws): Ch 1, Sc, sc. *Sk the 3 chs, 7 dc in the sc, sk 3 the chs, sc in the dc* repeat until the final st. Sc in the 3rd turning ch from previous row. Turn.
Row 3 (rs): Ch 3 (counts as dc), sk st, dc. *Ch 3, sk 3 dc and sc in the 4th dc, ch 3, sk 3 dc, dc in the sc* repeat until the final st. Dc in the final st. Turn.
Continue to repeat rows 2-3 until you’ve made a total of 17 (17, 17, 19, 21) (21, 23, 23, 23) rows on the back (or as many as you made on the fronts). Fasten off.
Crochet book now available - 21 patterns
〰️
Crochet book now available - 21 patterns 〰️
Sleeves
For the sleeves we only have six different sizes (instead of nine). That is because this stitch is tricky to work in half so we instead keep the full shells and have fewer sizes available. I have suggestions on sleeves for every size, but feel free to have a look at the size guide and make the sleeve width that will suit you the best.
Make 2.
Leave a tail of at least 40” (100 cm) for sewing the sleeve and then ch 52 (58, 58, 64, 70) (76, 76, 82, 82).
Alternatively make 51 (57, 57, 63, 69) (75, 75, 81, 81) foundation sc and skip row 1.
Row 1 (rs): In the 2nd ch from the hook, sc. Sc in every st across. Turn. 51 (57, 57, 63, 69) (75, 75, 81, 81) sts
Rows 2-3: Sc in every st across. Ch 1. Turn.
Row 4 (ws): Ch 1, Sc, sc. *Sk two sts, 7 dc in ss, sk two sts, sc* repeat until the final st. Sc in the final st. Turn.
Row 5 (rs): Ch 3 (counts as dc), sk st, dc. *Ch 3, sk 3 dc and sc in the 4th dc, ch 3, sk 3 dc, dc in the sc* repeat until the final st. Dc in the final st. Turn.
Row 6 (ws): Ch 1, Sc, sc. *Sk the 3 chs, 7 dc in the sc, sk 3 the chs, sc in the dc* repeat until the final st. Sc in the 3rd turning ch from previous row. Turn.
Repeat rows 5-6 until you’ve made a total of 38 rows (not including row 1-3) or until the sleeve is at preferred length, ending with a row 5. Fasten off, leaving a tail of around 35” (75 cm) for attaching the sleeve. Add more rows for longer sleeves, make less rows for shorter ones.
Beautiful versions from my testers


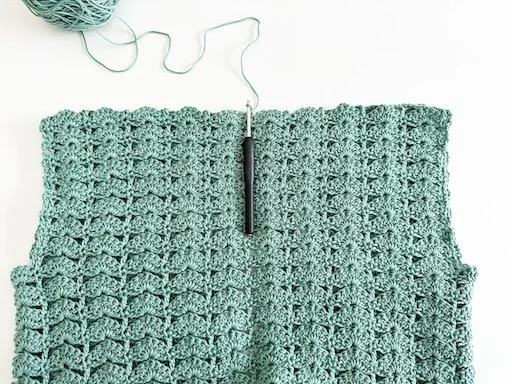
Assembly
With the ws facing up, fold the front sections over the back (and thereby getting the rs of the front sections now out). Sew the shoulders using the mattress stitch.


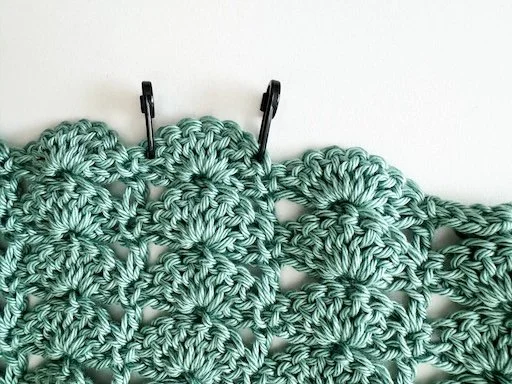
Neckline ribbing
Round 1: With the rs facing out, attach your yarn in the neck of the back of the neckline with a slip knot, ch 1. Sc in the ss. Sc around the neckline. Working your way from the back, over at the front and then down on bottom hem up over the other front until you are back where you attached your yarn. Join to the first st of the round with a sl st. Ch 1. Turn.
Crochet the sc as evenly as possible. It will be 1 sc for every st and on the fronts it will be approx. 1 sc for every sc row (row 4 on the body) and 2 sc per dc row (row 3 on the body).

Round 2-3: Sc in every st around. Join to the first st of the round with a sl st. Ch 1. Turn.
Attaching the sleeves
Fold the sleeves in half, lengthwise. Sew the sleeves from bottom up (rs facing out), using the tail you left. With the other tail, continue to attach the sleeve to the cardigan. Sew around the arm opening of the cardigan to attach the sleeve. Repeat for the other sleeve.


Weave in all ends.